
Cómo armar tu Gang Sheet
Build your own DTF gang sheet in a few minutes. Follow these steps; the numbers in each picture match the buttons you will click.
- 1. Size
- 2. Start
- 3. Upload
- 4. PressCheck
- 5. Size & copies
- 6. Resolution
- 7. Auto Nest
- 8. Auto Build
- 9. Add to cart
- 10. Save designs
1Choose your sheet size
On the Build a DTF Gang Sheet page:
- Pick a length from 2 to 50 feet. Every sheet is 22.5 inches wide. Longer sheets cost less per foot.
- Film style: Vibrant 9-Color (CMYK + RGBO + White), our 9-color print.
- Click Build your own Gang Sheet to open the builder.
Need less than 2 feet? Use DTF Transfers by Size. Already have a finished sheet file? Use Upload a DTF Gang Sheet.
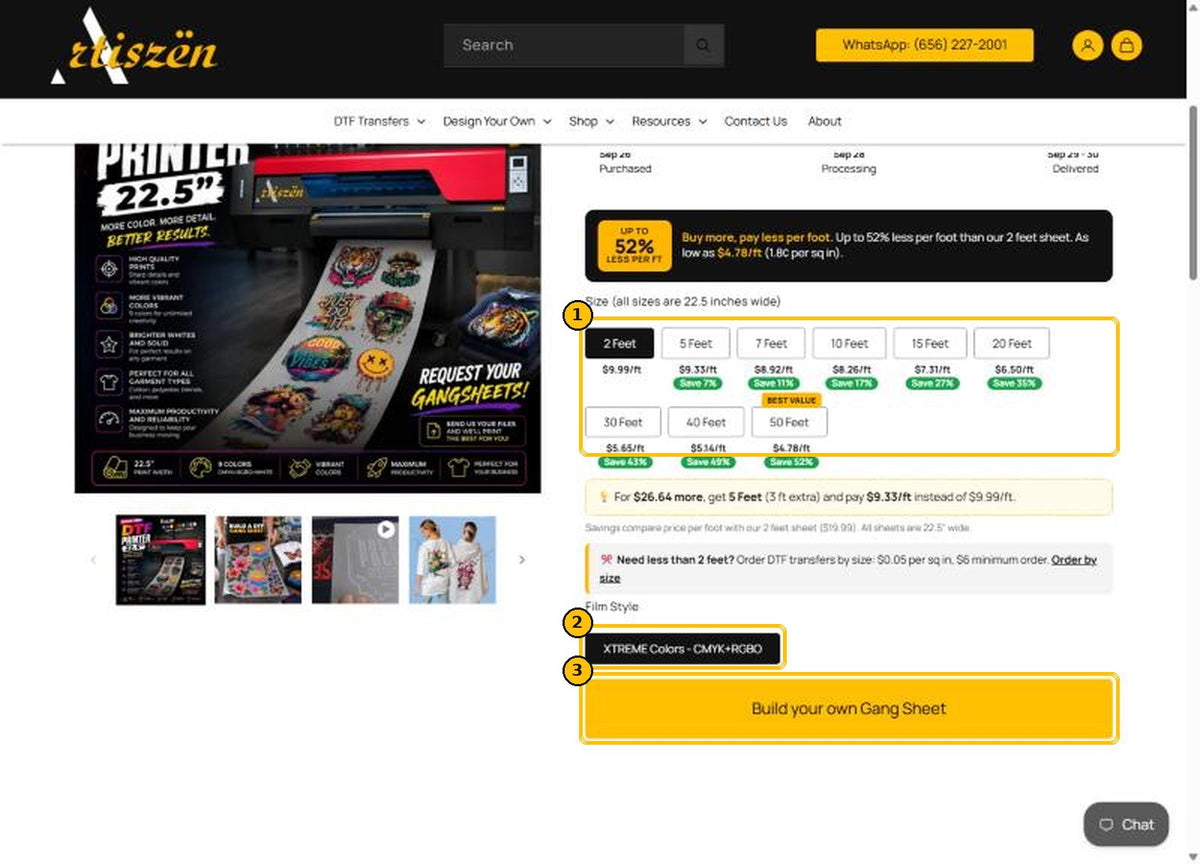
2Start a new sheet
The builder opens with a welcome window.
- Start a Brand New Gang Sheet: the normal way to start.
- Open a Previously Ordered Gang Sheet: reorder a sheet you already bought.
Auto Build is for uploading many designs at once (step 8).
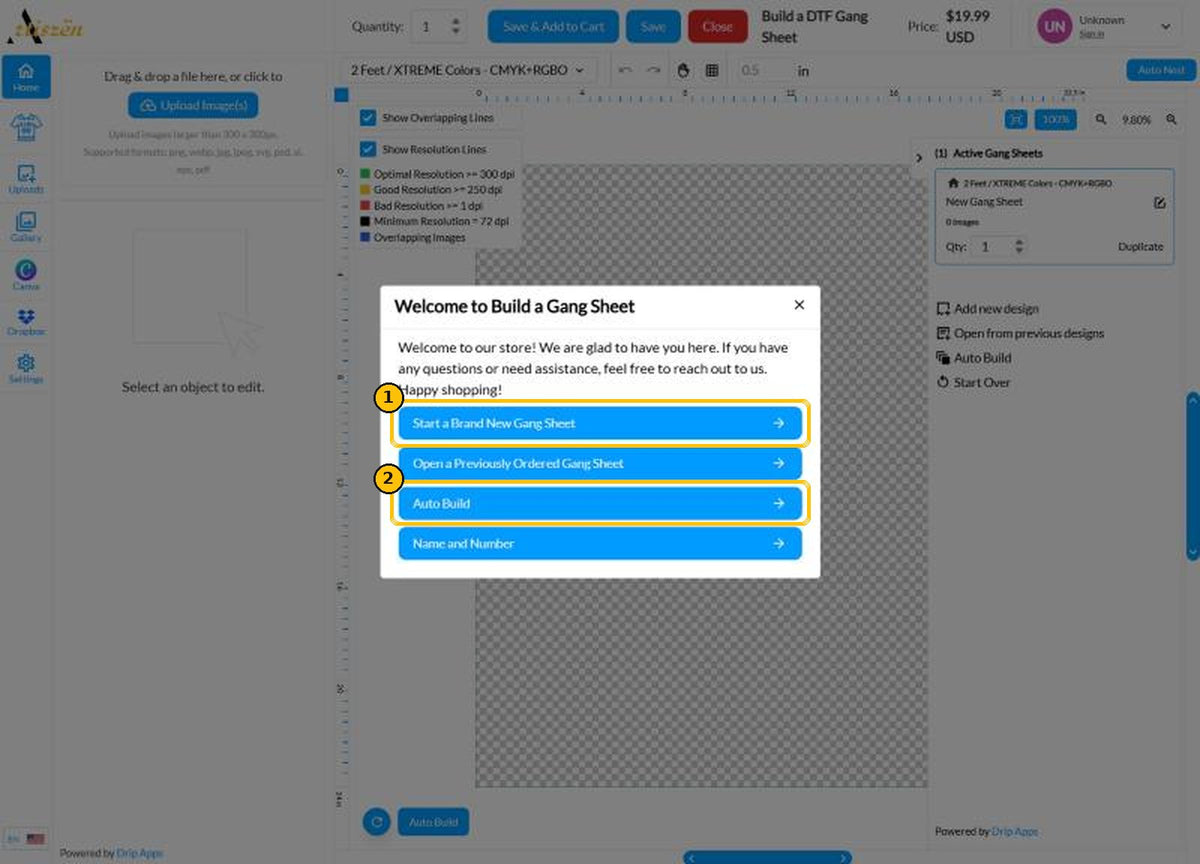
3Upload your designs
- Click Upload Image(s) or drag your files onto the left panel. You can select several files at once.
- Your files appear as thumbnails. Click a thumbnail to place it on the sheet.
Best results: PNG with a transparent background at 300 DPI, created at the size you want to print. Accepted: PNG, WEBP, JPG, JPEG, SVG, PSD, AI, EPS and PDF.
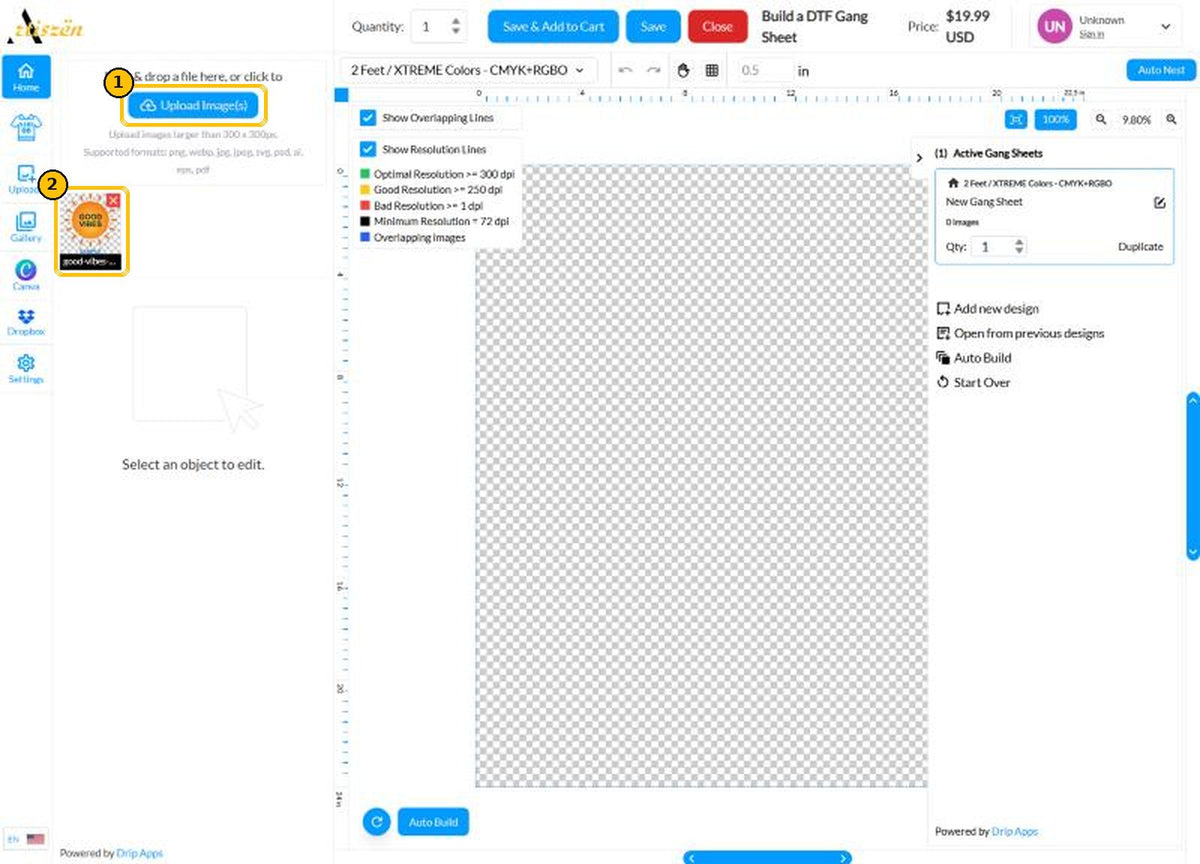
4Review the PressCheck report
After each upload the builder checks your file automatically.
- Green items passed. Yellow items say Needs review (for example low resolution or a soft, feathered edge).
- Fix selected issues or Fix all designs lets the tool try to correct them.
- Add to Builder places the file in your uploads and continues.
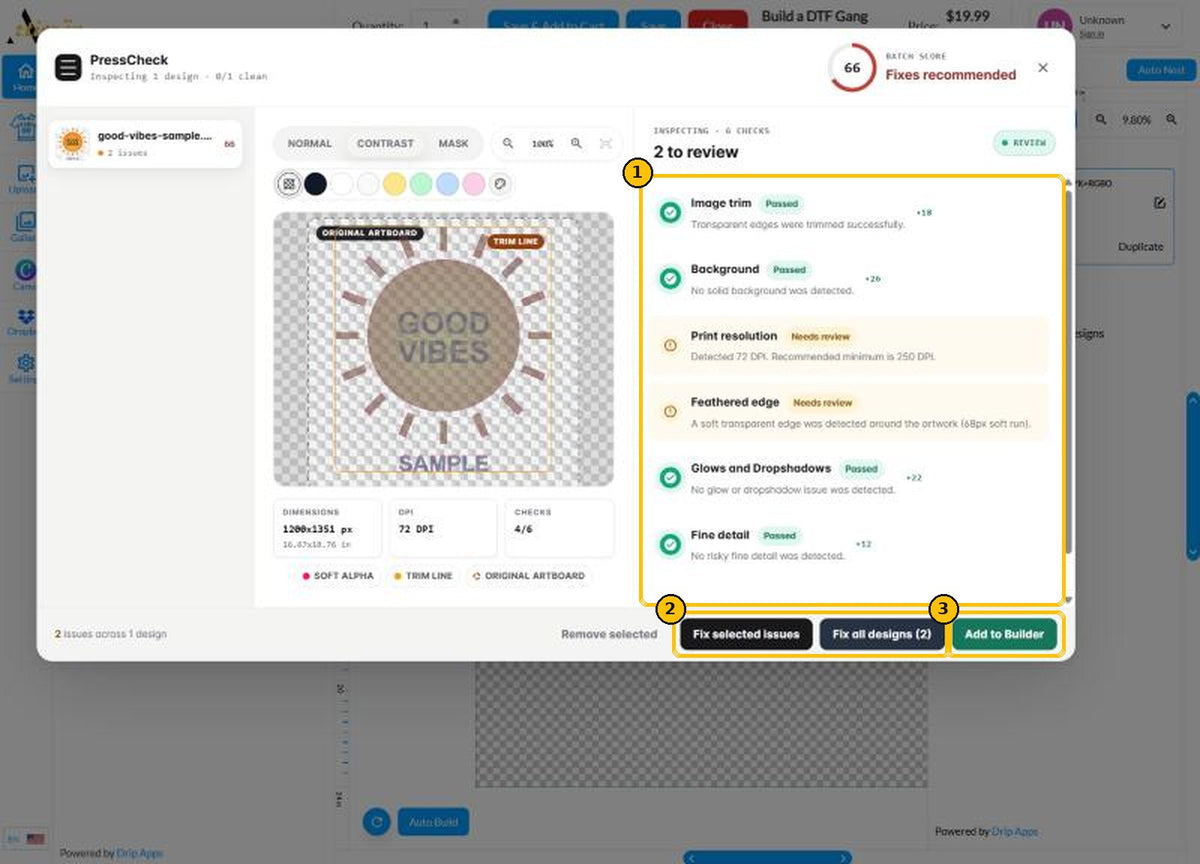
5Set the size and number of copies
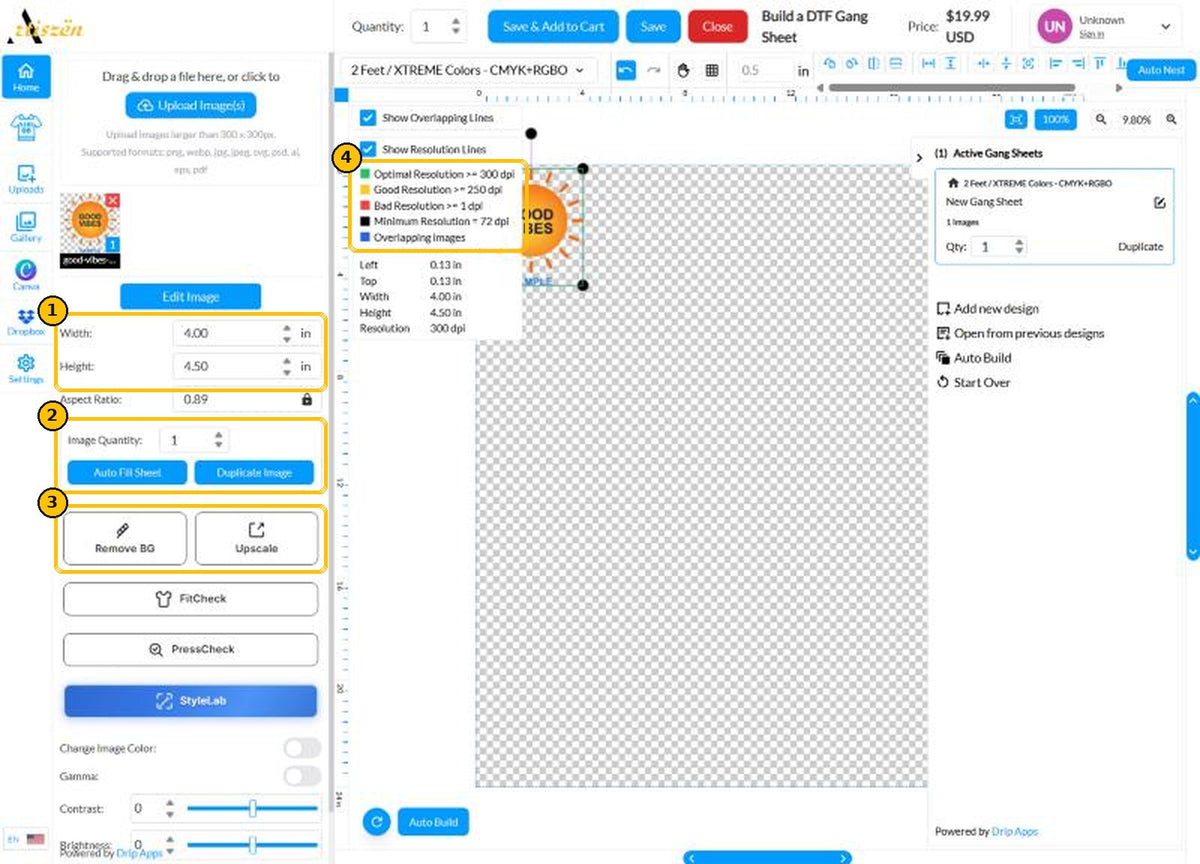
Click a design on the sheet to open its settings on the left.
- Width / Height in inches. Type one value; the other adjusts to keep the proportions.
- Image Quantity: type how many copies you want, then click Duplicate Image. Auto Fill Sheet fills the whole sheet with that design.
- Remove BG removes a solid background. Upscale improves a low-resolution file.
- The color legend shows the print quality of each design (step 6).
Common sizes: left chest 3.5 to 4 in wide; full front (adult) 10 to 12 in wide.
6Watch the outline color
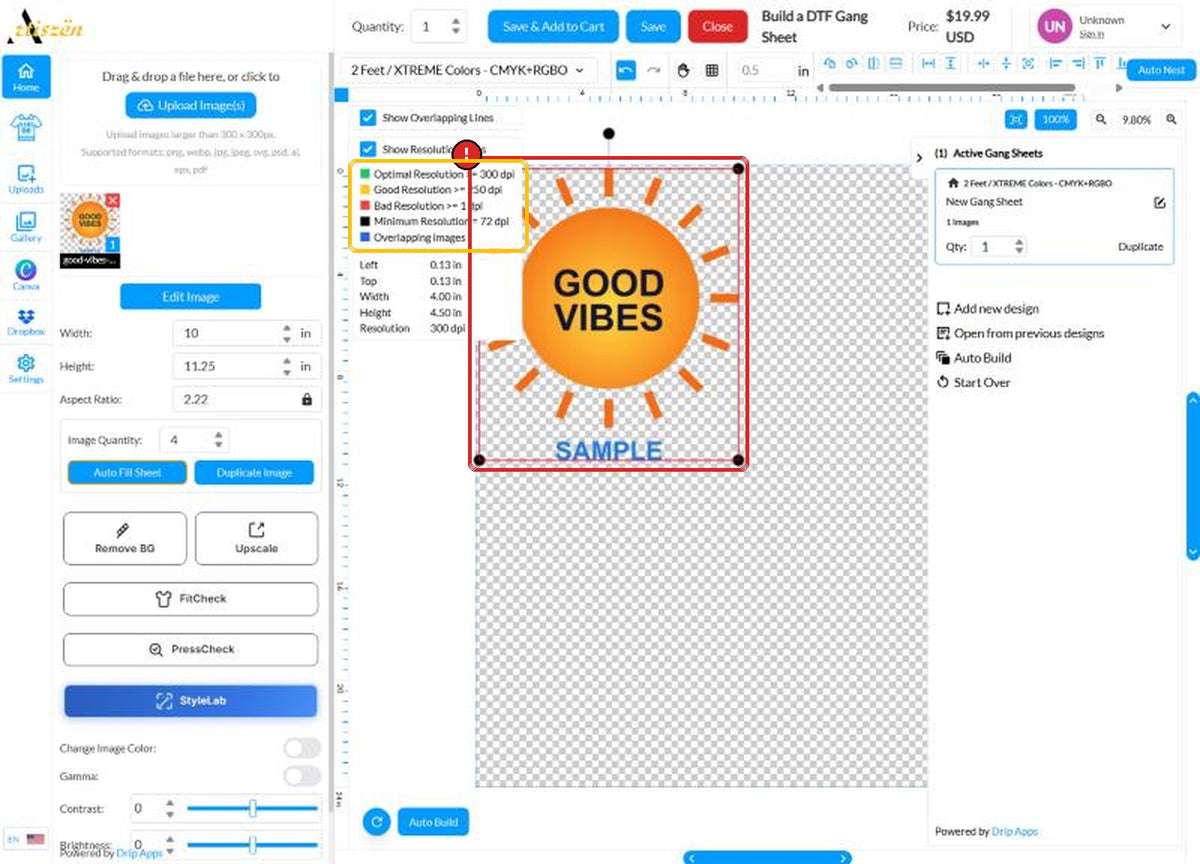
Each design gets a colored outline that tells you if it will print sharp at that size:
- Green: optimal, 300 DPI or more
- Yellow: good, 250 DPI or more
- Red: low resolution
- Blue: designs overlapping
A red outline means the file is too small for that print size and may look blurry. Make it smaller, click Upscale, or upload a larger file.
7Arrange with Auto Nest
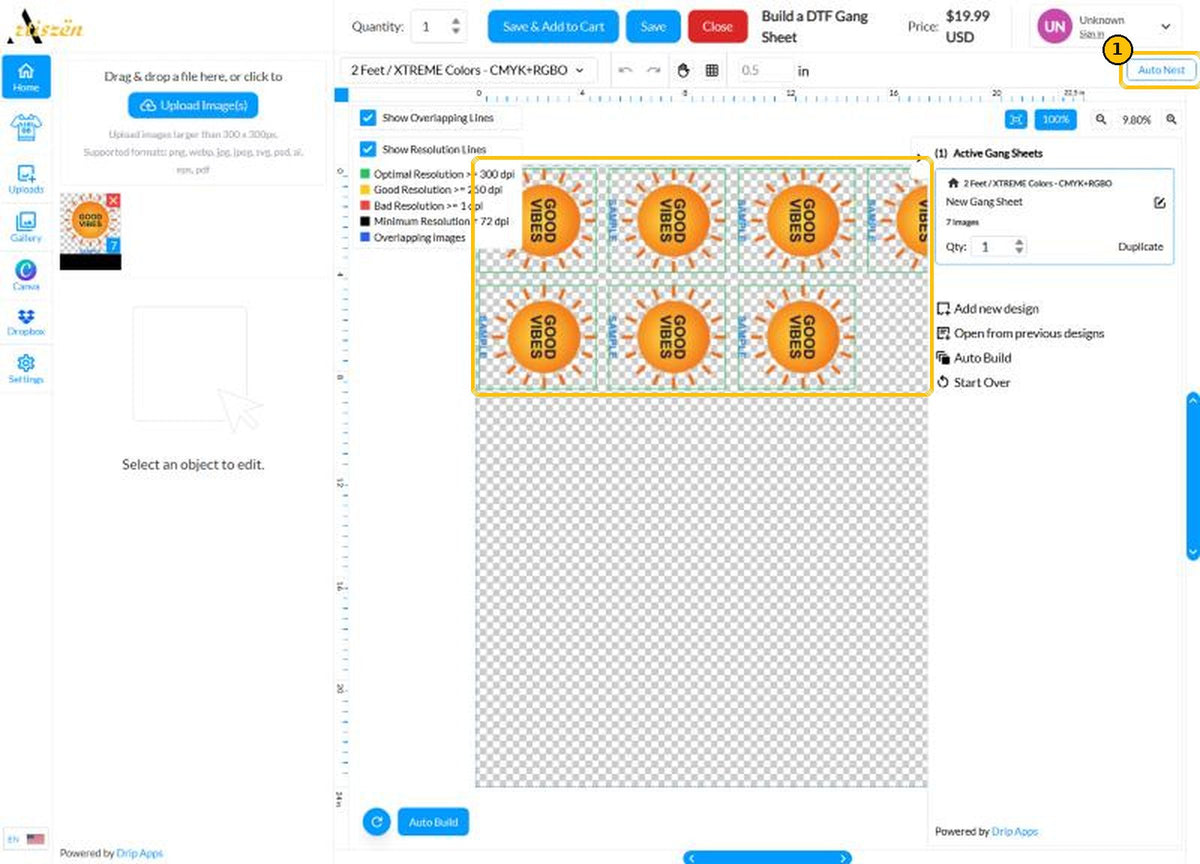
- Auto Nest (top right) packs all your designs tightly to use less film. It may rotate some designs; that is normal and does not change how they press.
You can also drag designs by hand. The right panel shows your active sheet, how many images it has, and the sheet quantity.
8Many designs? Use Auto Build
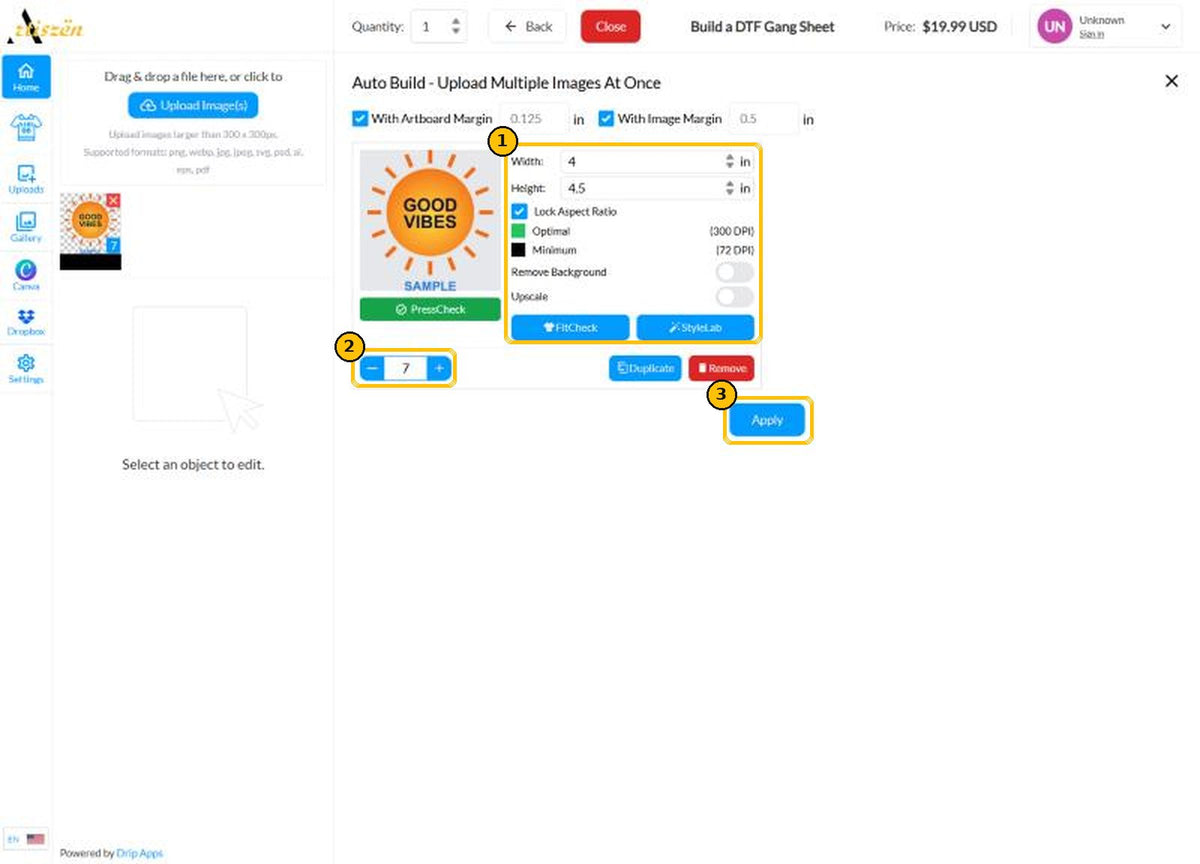
Click Auto Build (right panel or bottom left).
- Set the width, height and PressCheck for each uploaded design.
- Use - and + to choose how many copies of each.
- Click Apply and the builder lays everything out for you.
9Add to cart
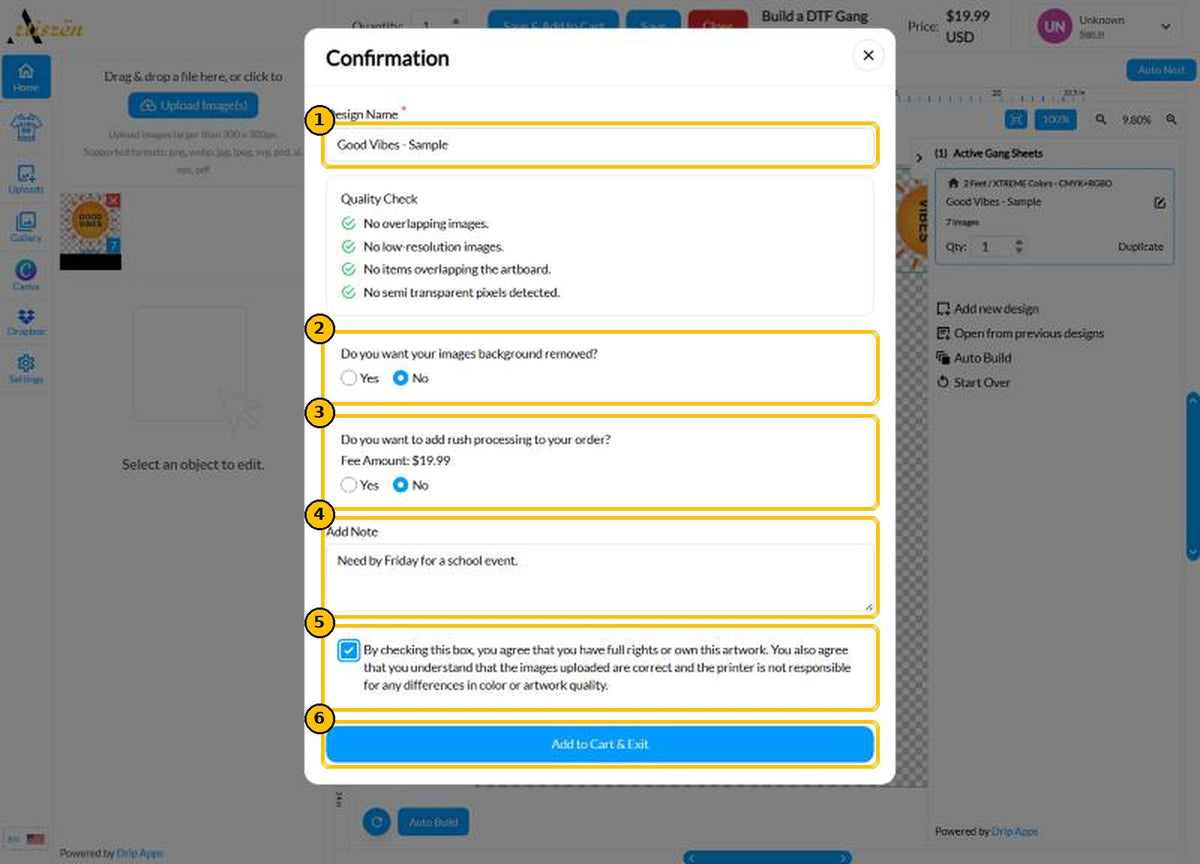
Click Save & Add to Cart at the top. A confirmation window opens:
- Design Name: name your sheet so you can find it later. The Quality Check below it should show all green checks.
- Background removed? Choose Yes if your files have a solid background you want removed. It's free: our design team removes it by hand.
- Rush processing is optional: same-day production for 25% of your order total.
- Add Note: anything we should know (deadline, event, etc.).
- Check the box to confirm you own or have rights to the artwork.
- Add to Cart & Exit, then check out from your cart.
10Save and come back later
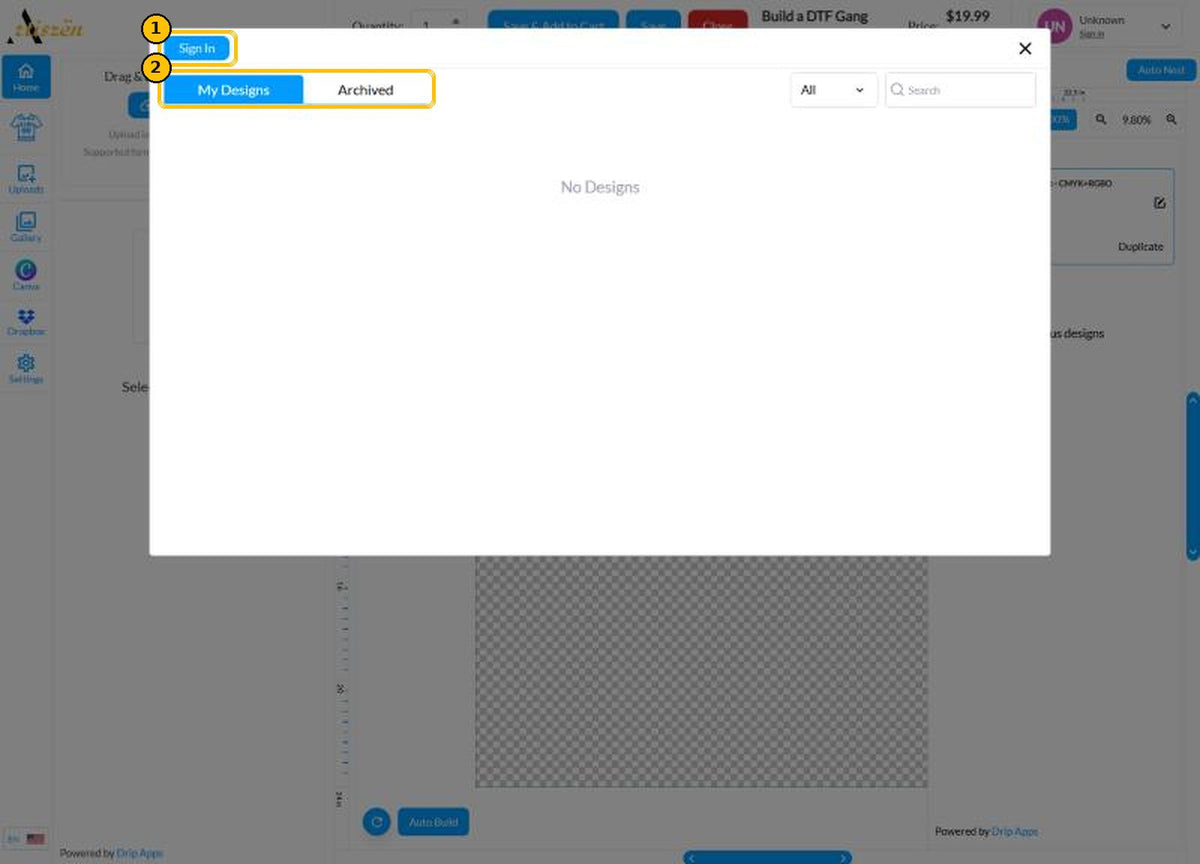
Use Save at the top to keep working later.
- Sign In to keep your designs in your account.
- My Designs (from Open from previous designs) lists your saved sheets so you can edit or reorder them.
Questions? Chat with us (bottom right) or WhatsApp (656) 227-2001.
Build my Gang SheetHow to press DTF transfersArma tu propio gang sheet DTF en pocos minutos. Sigue estos pasos; los números en cada imagen corresponden a los botones que vas a presionar. Los botones del editor aparecen en inglés, por eso los escribimos igual que en la pantalla.
- 1. Tamaño
- 2. Comenzar
- 3. Subir
- 4. PressCheck
- 5. Medidas y copias
- 6. Resolución
- 7. Auto Nest
- 8. Auto Build
- 9. Al carrito
- 10. Guardar
1Escoge el tamaño de tu hoja
En la página Build a DTF Gang Sheet:
- Escoge el largo, de 2 a 50 pies. Todas las hojas miden 22.5 pulgadas de ancho. Mientras más larga, menos pagas por pie.
- Estilo de film: Vibrant 9-Color (CMYK + RGBO + blanco), nuestra impresión de 9 colores.
- Presiona Build your own Gang Sheet para abrir el editor.
¿Necesitas menos de 2 pies? Usa DTF Transfers by Size. ¿Ya tienes el archivo de la hoja completa? Usa Upload a DTF Gang Sheet.
2Comienza una hoja nueva
El editor abre con una ventana de bienvenida.
- Start a Brand New Gang Sheet: la forma normal de empezar.
- Open a Previously Ordered Gang Sheet: para repetir una hoja que ya compraste.
Auto Build sirve para subir muchos diseños a la vez (paso 8).
3Sube tus diseños
- Presiona Upload Image(s) o arrastra tus archivos al panel izquierdo. Puedes escoger varios archivos a la vez.
- Tus archivos aparecen como miniaturas. Presiona una miniatura para colocarla en la hoja.
Para mejores resultados: PNG con fondo transparente a 300 DPI, creado al tamaño en que lo quieres imprimir. Aceptamos PNG, WEBP, JPG, JPEG, SVG, PSD, AI, EPS y PDF.
4Revisa el reporte PressCheck
Después de cada subida, el editor revisa tu archivo automáticamente.
- Lo verde pasó la revisión. Lo amarillo dice Needs review (por ejemplo, resolución baja o borde difuminado).
- Fix selected issues o Fix all designs intenta corregirlo.
- Add to Builder pasa el archivo a tus subidas y continúa.
5Ajusta la medida y la cantidad
Presiona un diseño en la hoja para ver sus opciones a la izquierda.
- Width / Height (ancho / alto) en pulgadas. Escribe una medida; la otra se ajusta sola para mantener la proporción.
- Image Quantity: escribe cuántas copias quieres y presiona Duplicate Image. Auto Fill Sheet llena toda la hoja con ese diseño.
- Remove BG quita un fondo sólido. Upscale mejora un archivo de baja resolución.
- La leyenda de colores indica la calidad de impresión de cada diseño (paso 6).
Medidas comunes: pecho izquierdo de 3.5 a 4 pulgadas de ancho; frente completo (adulto) de 10 a 12 pulgadas.
6Fíjate en el color del borde
Cada diseño tiene un borde de color que indica si va a imprimir nítido a ese tamaño:
- Verde: óptimo, 300 DPI o más
- Amarillo: bueno, 250 DPI o más
- Rojo: baja resolución
- Azul: diseños encimados
Un borde rojo significa que el archivo es muy pequeño para ese tamaño y puede salir borroso. Hazlo más pequeño, presiona Upscale o sube un archivo más grande.
7Acomoda con Auto Nest
- Auto Nest (arriba a la derecha) acomoda todos tus diseños bien juntos para usar menos film. Puede girar algunos diseños; es normal y no cambia cómo se planchan.
También puedes arrastrar los diseños a mano. El panel derecho muestra tu hoja activa, cuántas imágenes tiene y la cantidad de hojas.
8¿Muchos diseños? Usa Auto Build
Presiona Auto Build (panel derecho o abajo a la izquierda).
- Pon el ancho, el alto y revisa el PressCheck de cada diseño.
- Usa - y + para escoger cuántas copias de cada uno.
- Presiona Apply y el editor lo acomoda todo por ti.
9Añade al carrito
Presiona Save & Add to Cart arriba. Se abre una ventana de confirmación:
- Design Name: ponle nombre a tu hoja para encontrarla después. El Quality Check debe salir todo en verde.
- ¿Quitar el fondo? Escoge Yes si tus archivos tienen un fondo sólido que quieres quitar. No tiene costo: nuestro equipo de diseño lo quita a mano.
- Rush processing (procesamiento urgente) es opcional: producción el mismo día por el 25 % del total de tu orden.
- Add Note: cualquier detalle que debamos saber (fecha límite, evento, etc.).
- Marca la casilla para confirmar que el arte es tuyo o tienes permiso para usarlo.
- Add to Cart & Exit y luego completa la compra desde el carrito.
10Guarda y regresa después
Usa Save arriba para seguir trabajando más tarde.
- Sign In para guardar tus diseños en tu cuenta.
- My Designs (desde Open from previous designs) muestra tus hojas guardadas para editarlas o repetirlas.
¿Preguntas? Escríbenos por el chat (abajo a la derecha) o por WhatsApp al (656) 227-2001.
Armar mi Gang SheetCómo planchar transfers DTF